


Wild Game Recipes from On Wisconsin Outdoors
Our cookin' experts bring you wild game recipes. Send us your favorites at recipes@onwisconsinoutdoors.com.
Recipes By Suzette
Restaurant fish recipes
I frequently order fish while dining out, and I always try (but not always successfully) to replicate these wonderful dishes at home. Fortunately for all of us, two great chefs have graciously decided to share some of their favorite recipes with us. Try them at home, but don’t forget to enjoy them prepared by the experts as well!
Suzette Curtis of Oshkosh cooks for a family of hunters and fishermen, and says she tries to fill their menu with recipes for meals made with venison, upland birds and fish. She does just that with great expertise.
Pan Fried Walleye Pike
By Bob Wolf, Executive Chef – The Roxy
Walleye pike (skinned)
Flour (seasoned with salt and pepper)
2 T. olive oil
2 T. butter
Heat butter and olive oil in frying pan. Flour both sides of pike in seasoned flour. Put pike in heated skillet “skin” side up and cook for 3 to 4 minutes. Turn pike over and cook until done (approximately another 3 to 4 minutes).
Trout* Picatta with Lemon Caper Compound Butter and Sun Dried Tomato and Olive Couscous
By Mathew Chingo, Executive Chef – Old Rittenhouse Inn
Compound butter:
1 cup unsalted butter
Zest of 1 lemon
1 tsp. salt
2 T. capers
Combine butter, lemon zest, and salt in food processor until smooth. Add capers and pulse a few times to incorporate them into the butter. Spread onto plastic wrap into the shape of a log and wrap the butter. Refrigerate.
Couscous:
1 cup Israeli couscous
1/4 cup julienned sun dried tomato
1/4 cup kalamata olives halved and pitted
2 T. fresh chopped basil
2 T. olive oil
1 tsp. fresh minced garlic
Salt and pepper to taste
Boil the couscous as you would any other pasta "al dente." Drain and place in sauté pan and combine all other ingredients. Heat on low-medium heat for about 10 min.
For the whitefish:
1.5 lbs. fresh trout
1 cup flour
1 T. Kosher salt
1 tsp. white pepper
1/4 cup extra virgin olive oil
Combine flour, salt, and pepper and dredge trout. Add oil to sauté pan and heat at medium heat. Once oil is preheated, sear trout on each side for 2-3 min.
Slice your compound butter at your desired thickness (make sure to take off plastic wrap) and place on top of prepared fish. Enjoy! *This recipe is just as good with Whitefish if you prefer.
| Bird Season Roasted Pheasant Pheasant With Sauerkraut Avocado Rotel Salsa Egg Plant Parmesan Corn Souffl e Raspberry Custard Meringue Pie |
Wild Mushrooms Cream of Wild Rice Wild Mushroom Soup |
Blue Gill Potato Pancakes Bluegill |
 |
 |
 |
Cook'n With Kristine
May 2010
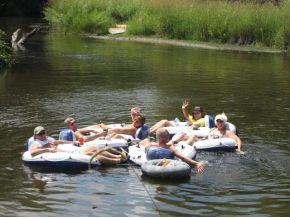
 The temperature is rising and the days are getting longer. I am really looking forward to my first trip down my river. The water is running fast and only a few carp have been seen, but soon the fish will be plentiful and I will have a hard time making the choice of gliding quietly down with an Ultra Lite in my hands to capture the joy of the tail dance of my Small Mouth Bass as he tries to swindle his way off my hook or a leisure float with friends… a “cold one” quenching my thirst and a picnic lunch on a sand bar.
 Where I live the White River runs unencumbered from the Neshkoro Mill Pond all the way to the Fox River. What may take 5 minutes or less by car takes 3-4 hours by water to the first bridge. While White River photomeandering through the twists and turns of the white sand bottom river, Mother Nature offers some of the most beautiful scenery and wildlife found anywhere in Wisconsin. A fisherman’s paradise with the adventure of catching an elusive Brown… Spearing a Carp (wonderful smoked) or the plentiful Small Mouth that puts up a challenging fight. There are giant Northern and even a Musky has been known to mysteriously find its way up to spawn. Oh, and the Catfish… yum… are plentiful for those who like night fishing. The slews are a duck hunters dream. If I had to say I live in Paradise… You bet I do!
Well now that my River is no longer one of Wisconsin’s “best kept secrets”… feel free to forget everything you just read and go back to the Mecan, the Pine or the Willow……
One of my favorite dinners on a cool spring night when comfort food is still a good way to take the chill off and my freezer is still stocked with some of last fall’s harvest is Braised Rabbit and Mallard in a rich brown gravy served along side a rich casserole of wild rice loaded with sautéed wild mushrooms and onions. And for dessert …a delicious Raspberry Pie
I like combining rabbit with duck, chucker breast or pheasant to render a richer flavor…. The rabbit seems to compliment any waterfowl …see what you think.
Braised Rabbit and Fowl – Serves 6
Recipe by Kristine James
4 Lbs Rabbit and Fowl
1 Large Sweet Onion slice in ¼” pieces
1 Qt Buttermilk (buttermilk removes any gamey taste)
1 Qt Whole Milk
¾ Cup Bacon Grease (vegetable oil may be substituted, but the flavor will not be the same)
2 Cups All Purpose Flour
Salt and Pepper to taste
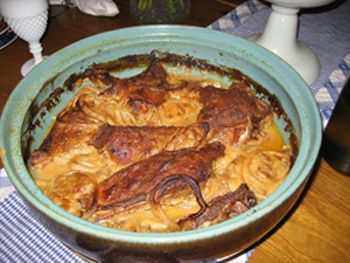 Preheat oven to 300 degrees. Clean, skin and quarter rabbit and birds (a full Chucker breast equals a quarter). Place neck or part of a back can be used in 1 quart plus ½ cup of water and onion ends and skin. Simmer about 1 hour… to be used for wild rice later. Grease a large covered baking dish.
Using 1 ½ cups flour, dredge meat thoroughly and set aside. Melt ¼ cup bacon grease in a LARGE heavy skillet at medium/high heat. Fry ½ of meat until nicely browned sprinkling with salt and pepper to taste. Takes 5-8 minutes. Put first layer in greased baking dish and arrange ½ of separated onion slices over the top. Salt and Pepper… I like lots of pepper. Melt another ¼ cup bacon grease and repeat with the remainder of the meat.
Rue: Turn heat down to low. Add the last ¼ cup bacon grease to drippings and loosen the bottom of any brown areas. Add remaining flour from the dredging plate and an additional ½ cup flour to create a paste.
Turn heat up to medium… medium/high and slowly add butter milk stirring constantly until bubbly and thick. Add the quart of whole milk and continue stirring until it begins to boil. Turn off heat and pour over meat. Cover
Cook at 300 degrees for 4-4 ½ hours
Rice with Wild Mushrooms and Onions
Recipe by Kristine James
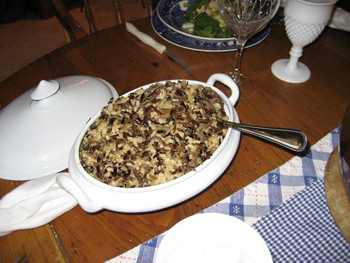 1 Lb Wild Mushrooms (I like Hens of the Woods because the freeze well, but Oyster, Morels, Baby Bellas or what ever rice photoyou like will work great) Chopped in large chunks.
¾ Cup Wild Rice
¾ Cup Brown Rice
3 Cups Broth
1 Cup Beer
¼ Lb Butter
½ Large Sweet Onion… Chop in large chunks
2 Healthy Pinches Course Sea Salt
Strain broth that has been simmering. In a 2 quart sauce pan put wild and brown rice. Add 3 cups broth and 1 cup beer and 2 Healthy pinches Sea Salt. Bring to a boil… stir… cover and simmer on low for one hour or until all moisture is absorbed. In a medium sized heavy skillet on medium heat, melt butter. Add Onions and Mushrooms and fry until just starting to brown. Remove from heat. Mix with rice and serve.
Fresh Raspberry Pie with a Crumble Top (Serves 10)
Recipe by Kristine James
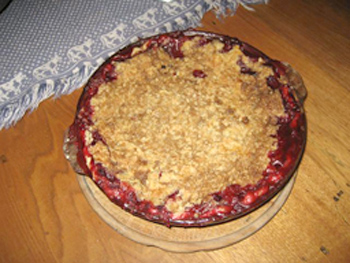 5 Cups Fresh or Fresh Frozen Raspberries
1 ¼ Cup White Sugar
½ Cup All Purpose Flour
1/8 tsp cinnamon
Crumble Top:
1 Cup All Purpose Flour
½ Cup Firmly Packed Dark Brown Sugar
¼ Lb Salted Butter
10” Single Pie Crust:
1 1/3 Cups All Purpose Flour
¼ tsp Salt
1/2 Cup Shortening or 1/3 Cup Lard plus 2 Tblsp Bacon Grease (Great Flavor)
3-4 Tblsp Cold Water
Preheat oven to 425 degrees
Crust:
Mix flour and salt in a medium size mixing bowl. Cut in shortening until crumbly. Add cold water one tablespoon at a time mixing with a fork until all the flour is moistened and dough almost clings to the side of the bowl. Gather dough into a ball and flatten on a well floured board. Roll dough 2 inches larger than inverted pie pan. Fold pastry in half and ease onto pie plate. Trim ½ inch from rim and fold under and crimp with fork or edge using your finger tip. Set aside.
Topping:
In a smaller bowl, cut together 1 cup flour, ½ cup brown sugar and butter until crumbly. Set aside.
Filling:
Mix all berries, sugar, flour and cinnamon. Pour into pie crust. Sprinkle topping evenly over berries.
Cover edge with aluminum foil. Place a piece of foil over top as well. Place in oven. For fresh berries… remove top piece of foil after 50 minutes and crust foil after 60 minutes. Turn down heat to 350 degrees and continue baking till brown and bubbly (about another 15 minutes. For frozen berries… remove top foil after 60 minutes and crust foil after 70 minutes. Reduce heat to 350 degrees and continue baking until brown and bubbly.
Venison Chili - Texas Style
Recipe by Kristine James
3 LBS VENISON BURGER (CUT ABOUT 25% PORK)
1 ½ LBS VENISON HIND QUARTER STEAK –CUBED
1 TSP SMOKEY MESQUITE SEASONING
2 ½ TSP CAYENNE
2 TSP CHIPOLTE SEASONING
1 TSP CUMIN
½ TSP SEA SALT
1 TBSP MEXICAN OREGANO
1 TBSP SMOKED PAPRIKA
4 TBSP MINCED GARLIC
2 LARGE SWEET YELLOW ONIONS – ROUGH CHOPPED
2 LBS BABY BELLA MUSHROOMS – SLICED
3 28OZ CANS DICED TOMATOES
2 12OZ CANS TOMATO PASTE
2 12OZ BOTTLES SMITHWICKS ALE (OR ANY GOOD LIGHT ALE)
BROWN MEAT WITH ONION AND ALL SEASONINGS. ADD MUSHROOMS, TOMATOES, PASTE, BEER AND ADOBO. SIMMER AT LEAST 4 HOURS. COOL OVER NIGHT AND REHEAT.
CRÈME ROTTELE
Recipe by Kristine James
16 OZ CONTAINER SOUR CREAM
1 CAN ORIGINAL ROTELLE
¼ TSP GARLIC POWDER
MIX IN CHOPPED SWEET ONIONS AND SHREDDED SHARP CHEDDAR
Apple Bread Pudding
Recipe by Kristine James
4 CUPS CINNIMON RAISON BREAD
2 MEDIUM APPLES, PEELED & DICED
2 CUPS SCALDED CREAM
2 TBSP. BUTTER MELTED
3 EGGS
1/3 MAPLE SYRUP
1 TSP. VANILLA
1 TSP. CINNAMON
¼ TSP. NUTMEG
¼ TSP. CLOVES
1 TSP. GRATED LEMON RIND
MIX BREAD WITH APPLES; SET ASIDE. COMBINE CREAM, BUTTER, EGGS, MAPLE SYRUP, VANILLA, CINNAMON, NUTMEG, CLOVES, AND RIND IN BLENDER OR WITH HAND MIXER. POUR OVER BREAD/APPLE MIXTURE SPOON INTO A BUTTERED 2 QT. CASSEROLE OR INDIVIDUAL RAMEKINS. SET DISH IN A LARGER PAN OF HOT WATER; BAKE AT 350 FOR 1 HOUR OR UNTIL KNIFE INSERTED IN CENTER COMES OUT CLEAN. SERVE WARM WITH WHIPPED CREAM OR ICE CREAM. (6 SERVINGS)
Looking for a good game recipe? Or just have a general preparation question?
Just email me: cooknwithkristine
Getting Pickled: Pickled Pike Recipes
by Denny Murawska
The ice fishing, or "hard water," season here up north lasts a long time. Many tournaments are held in February, a good time to become distracted from cabin fever. It will not be long before the ice gradually returns to its liquid phase, but we are not there yet. As I write, an army of anglers still hunker over mysterious, dark holes in the ice, trying to divine the fate of their quarry below. Perhaps you have already stocked up on some juicy fillets and wonder how to best prepare them. Fish taken from icy-cold water are some of the finest eating. Most of these get beer-battered and served up as crispy hunks of goodness. Nothing quite like fresh fish!
However, there is another way to enjoy them, and that is pickling. Any fish can be pickled, but northern pike are some of the best. And, with tip-ups flying in the breeze, now is a perfect time to try your hand at this venerable method of preparation. Forget the herring you may have sampled in stores. Pike come out way tastier, and you can have fun experimenting with your own blend of spices.
If this is your first venture into pickling, you will be surprised at how easy it is. The results are goof-proof. The end product will keep for weeks and dissolves those pesky Y bones common to pike. Here are some tips to turn out a gourmet's delight.
First, fish need to be frozen at least four days. This destroys any parasites which may be present. Water should be high-quality drinking water. Tap water high in hardness, iron, or other minerals can give an off flavor. If this sounds like your tap water, use bottled water. Vinegar is another key ingredient. White vinegar with an acid content of 5 percent is best and will not give the fish an off color. Vinegar at the recommended levels helps prevent bacterial growth. Salt should be the pickling or canning variety. It should not be iodized. Plain table sugar is used as a sweetening agent.
With those basics at hand and your fillets cut into chunks, it is time to pickle.
In a non-metal container, for each 5 pounds of fish, dissolve 2-1/2 cups of salt into one gallon of water. Refrigerate for 48 hours. This is called brining. Rinse the brined fish in cold water and cover with undiluted White vinegar for another 24 hours. This further firms up the flesh and dissolves tiny bones. Now, it is time to pack the fish in jars. Place chopped onions in the bottom and top of the jar before covering with one of the following pickling solutions.
Herring Style
(for 5 pounds of fish)
1 quart distilled vinegar
5 1/2 cups sugar
4 teaspoons of pickling spice
1 cup dry white wine
Combine these ingredients (except the wine) and bring to a boil. When cool, add the wine and place scalded lids on your jars. Refrigerate a week before eating. These should keep six to eight weeks in the fridge.
Mustard Pickle
(for 5 pounds of fish)
1 cup vegetable oil
3 cups distilled vinegar
1/3 cup prepared mustard
1/2 cup sugar
1 tsp ground white pepper
1 tsp pickling spice
3 bay leaves
Mix these and bring to a boil. When cool, fill jars with the solution and onions. Cover with scalded lids and refrigerate a week before sampling.
Joe Jackowski's Ultimate Pickle
Step 1
1 qt cut and skinned fish
1 cup White vinegar
5/8 cup pickling (canning) salt
Place in large jar and let stand in fridge covered for
7 days. Shake once a day.
Step 2
On day 8, rinse with cold water until water runs
clear. Let stand in cold water for 1 hour.
Step 3
Slice desired amount of small onions (yellow are
best)
Step 4
In saucepan, mix:
1 cup White vinegar
1 cup sugar
Heat until sugar dissolves but don't boil
Add 1 cup of fruit wine (Boone's Farm or
something made from apples or pears) and let cool.
Step 5
Drain water from step 2, add onions and cool mixture
from step 4. Cover and let stand for 48 hours.
Enjoy your pickled pike!
Bass Ready to Eat...
by Mike Yurk
 Bass have gotten a bad rap over the years. No one will disagree that bass are fun to catch and that they put up a heck of a good fight, especially on light tackle. However, once you start talking about eating bass and putting them on the dinner table, lots folks will tell you that bass are no good to eat. I have eaten my share of bass and can tell you that is not true. Bass are tasty.
People will tell you that bass might be good in the spring, but never eat one in the summer. They taste fishy, they say. That also is not true. In mid-July, I pan fried some bass fillets for a couple of fishing buddies and I to have with eggs for breakfast. The fish tasted just fine, with no fishy taste.
I am not sure where this bad rap came from. When I lived down south; I ate bass all the time throughout the year and never had a fishy fillet.
All we had were crappies, bluegills, catfish, and bass. There were no walleyes down south, so people ate what they caught, and that included eating bass if you were looking for a fish dinner. After living for over 10 years down south, I find nothing wrong with eating bass and never did develop a prejudice against eating it.
A couple of general tips will help. For most recipes, take off the skin. If there is a fishy taste, it usually comes from the skin. Secondly, soak the fillets in milk. Soaking bass in milk only for a couple of hours will help. Soaking them overnight is even better. The milk will also remove any possible fishy taste. Thirdly, if at all possible, eat your bass as soon as your can. If you aren’t planning on eating them within the next day, then freeze them as soon as you get them cleaned. Also, make sure to freeze them in water. That will prevent freezer burn on the fish. Do not let them stay in the freezer for long. Eat them within a few weeks, and do not let them sit in the freezer more than three or four months.
Here are some of my favorite recipes for bass
Pan Fried. Roll your fillets in spiced flour. At the grocery store you can find any number of fish breading mixes that are flour based. One of my favorites is Fry Magic. If you want to make your own seasoned flour, this is one of my favorites. Shake out a small pile of flour on a plate. Add paprika, ground pepper, and just a little bit of garlic powder. Mix with a fork and you are ready to start. Melt butter in a pan and drop in the fillets. Turn often and fry until the edges are brown. If you would like to zip this up a bit, roll the fillets in powdered ranch dressing. It will give the fillets a bit more of a tangy taste. You can substitute frying the fillets in butter by frying them in Buttered Crisco.
Deep Fried. You can either use the whole bass fillet or cut the fillets into inch-long strips and make them into bass fingers. Bread the fish by either dropping the fillets into a bag with the breading and shaking it, or put the fish in an egg wash and roll them in breading. There are a lot of breading mixes out there, and they can be found in sport shops and grocery stores. One of my favorite store bought mixes is Andy’s Seasoned Fish Breading. If I am going to make my own, I just use Italian bread crumbs. Heat vegetable oil in a pot and drop in the fish. Fry until the fillets are brown. For a little something different you can substitute Buttered Crisco or peanut oil for vegetable oil.
Cooking with aluminum foil. Cut off pieces of aluminum foil. Place orange and lime slices on the foil and put pads of butter on the fruit slices. Sprinkle salt and pepper on the fillet and place it on the butter. On top of the fillet put pads of butter, and on top of the butter put slices of orange and lime. Wrap the aluminum foil around the fish and put on the grill. Turn the aluminum foil packet every five minutes and cook for about 30 minutes.
On the grill. This recipe is an exception to the rule of removing the skin. Scale the bass and fillet, leaving the skin intact. The skin will help hold the meat of the fish together as you are grilling and will generally come off anyway by the time you are finished cooking. Place a layer of aluminum foil over the grill. With a knife or fork, punch holes in the aluminum foil to let the smoke through. In a small pot, melt a stick of butter and mix it with Worcestershire sauce until the mixture is light brown in color. Place the fillets on the aluminum foil on the grill. Turn often, and each time baste the fillets with the butter and Worcestershire sauce. Grill fish for about half an hour until they turn brown.
If you have any lingering doubts that bass are good to eat, these recipes should completely dispel that. Bass are as good as any fish to eat, so keep a few to enjoy.
[Read Mike Yurk's column "Keeping Bass For Better Fishing" in the Mar/April 2012 issue of On Wisconsin Outdoors}
The Konus Kitchen is Getting Hot!
May 7, 2012 – Put your aprons on and sharpen your knives, the Konus Kitchen is now open! Launching in May, this new section of the Konus Facebook page will feature wild game recipes, cooking tips from pros, and special promotions.
To kick-start the Konus Kitchen, Konus is celebrating all those moms who work tirelessly to feed their families. And for the love of the hunt, the company is calling mothers to post a recipe for their best game-prepared meal. Each recipe posted will be entered into the a sweepstakes and the winning recipe will be featured on the Konus Facebook page. The winner will receive a kitchen gift set and a Konus apron. A list of the top 10 best recipes posted will also be featured on the Konus Facebook page.
To enter, submit recipe and photo via the Konus Facebook page – www.facebook.com/konuspro. Contest begins on Monday, May 7th and all votes must be submitted by Friday, May 11th. Winner will be announced on May 14, 2012.
About Konus
For more than 30 years, Konus has provided customers with the highest quality European-designed products for their sporting needs, with special attention given to avid hunters and tactical shooters. Konus products range from riflescopes to spotting scopes and from electronic dot sights to binoculars (and more), with all KonusPro products warranted under a Limited Lifetime Replacement Warranty. Konus also offers the unprecedented Konus Lifeline, an expedited remote replacement program designed to allow hunters to get live customer support and request a replacement Konus scope to be sent to their hotel, cabin or lodge via overnight shipping. Konus’ world headquarters are based in Verona, Italy, while KONUS USA headquarters are based in Miami, Florida. For more information, please call 305-262-5668 or visit www.konususa.com.
For all press inquiries including product prices and high-resolution images, please contact Melly Bonita at engage-pr@wnvsales.com.
Chef Tim's BBQ Sauces: Basic brings out the best
By Chef Tim
When it comes to barbecue sauces, there are three types that you’d find on my dishes. You could call them basic – but they always seem to bring out the best of what I’ve got cooking on the grill.
My three favorites start with a basic ingredient -- tomato, vinegar or mustard. While I always give you the ingredients, sauces are made to be your own! So feel free to experiment with my recipe. Once you are satisfied with the basic sauce recipe, by all means, alter it to your liking.
Please note: These sauces contain a lot of tomato or sugar. That means they are not good for use during the cooking stage of barbecuing as they burn too easily. I suggest these are best used as a marinade or just to finish off the meat before taking it off the grill.
Here they are:
Tomato-based BBQ Sauce
- 1 can of regular tomato sauce
- 1 can of tomato paste
- 2 tablespoons of vinegar
- 2 tablespoons olive oil
- 3 cloves crushed garlic
- 4 tablespoons minced onion
- 1 tablespoon Worcestershire sauce
- 1 teaspoon dry mustard1 teaspoon cayenne (optional)
- Fresh ground pepper to taste (coarsely ground)
Get a pan and cook the garlic and onion until soft -- then add everything else. Simmer this on low for about 20 minutes. Stir frequently, then cool by refrigerating a few days before use. Now, taste it and give it a minute to settle into your taste buds. You might find altering the amounts of the ingredients will suit you better. Experiment! I do all the time. This is what makes cooking fun!
Vinegar-based BBQ Sauce
- 1 and one-half cups apple cider vinegaro
- one-half cup hot water
- 2 tablespoons brown sugar
- 1 tablespoon paprika (But, I’ll be honest -- I’m just not sure this is necessary.)
- 1 teaspoon cayenne
- 1 teaspoon salt
- 1 teaspoon black pepper (I prefer the coarse grind.)
Put the brown sugar in the hot water and mix well until the sugar is dissolved. Add all the rest of the ingredients and heat on low for a few minutes. This is just to get everything mixed and at the same temperature. Note: Don’t wear a white shirt or blouse while eating this one!
Mustard-Based BBQ Sauce (and my all-time favorite!)
- 1 cup yellow mustard
- one-third cup brown sugar
- one-half cup balsamic vinegar
- 2 tablespoons butter
- 1 tablespoon Worcestershire sauce
- 1 tablespoon lemon juice (optional and lime would also work)
- 1 teaspoon cayenne (optional)
Mix everything in a sauce pan and simmer on low heat for 30 minutes. This is the one I grew up on.
Finally, if you don’t have anything else in the kitchen you can make do with just a couple of ingredients. One simple one is honey and ketchup; another is honey and mustard. I told you, I experiment a lot!
Have fun!
Chef Tim reminds readers that consuming raw or uncooked food can be harmful to your health, and increase your chances of acquiring a foodborne illness.
Don't Freeze that Venison - Can it!
By: Chef Tim
Here’s one of my favorite ways to preserve meat – canning. This works well for those less-tender cuts of meat and is a quick way to have something available without having to wait for thawing.
Yes, freezing has its role and is an effective way to preserve your venison and other meats for that special meal. However, consider canning if you are the type who decides at the last moment that tonight is the night to enjoy that venison. You simply open the can, heat while you set your table and serve!
It’s another simple way to eating well. While I have written this for venison, this works well for any meat – squirrel, rabbit and more.
Here are the simple steps:
- Cut the venison into about ½ inch chunks.
- Brown the chunks in whatever you prefer (most use cooking oil) in a fry pan.
- Add 1 cup water to the fry pan. Cover and simmer for about 15 minutes.
Note: It will take a couple of fry pans full of venison chunks to make 4-5 pints of canned meat. Of course, if your fry pan is like mine (really big) you can make do with one.
- Heat the glass jars (ever wonder why it’s called canning when no can is used?), the covers and the lids in a shallow pan.
- Put your pressure cooker with the rack in place (I call this fix’n to get ready).
- Next: add just more than one quart of water to the bottom of the pressure cooker. Put it on the burner – and that burner needs to be on low heat.
- Put the venison in the jars. Make sure you don’t cram it in too tightly which may be your reflex. Don’t give in. Leave some room.
- Now for the salt. Pay close attention here: add 1/2 teaspoon to each pint jar. If you are one of those who thinks it makes a difference, you can use sea salt, kosher salt or if you’re like me . . . whatever salt I have close by.
- You should have some liquid remaining in the fry pans. Divide that equally among the pint jars. Then, add water so the jars are about half-full.
- Put your sterilized lids on the jars tightly. Put the jars in the pressure cooker, cover and place the valve on top to 10 pounds of pressure. Crank up the heat!
When the little thingy on top starts to jiggle with steady rhythm, turn the heat down so it stops and starts occasionally. Let that go for just more than an hour. If you are the strict recipe kind, then let’s call it 80 minutes. However, I do recommend you do try to relax as this is fun work!
Now remove the pressure cooker from the burner and let it cool. Once cooled, open it carefully. Remove the jars and let them cool. My mom used to turn the jars upside down for a few minutes (on their lids) and then right side up after that. Once they are cooled, check for seal. Remove the rings from the jars after a day – or if you are that strict time person. Let’s call it a 24-hour wait – and revisit my call to relax about this.
Now, you can open the jars at any time, even years later! It makes excellent stew and chipped beef. I personally like to put it over noodles (that’s pasta for you culinary folk).
Enjoy!
Chef Tim reminds readers that consuming raw or uncooked food can be harmful to your health, and increase your chances of acquiring a foodborne illness.